Bandana mask

July 26, 2020

Materials needed are:

A bandana

2 pieces of string/cord

1 elastic hair tie

Tie the ends of the cord together to make loops as shown above. The pieces I used were about 20 inches long and made loops about 9 inches long after they were tied. Then take each one and loop it through the elastic hair tie, one on each side as below.

Pull them tight.

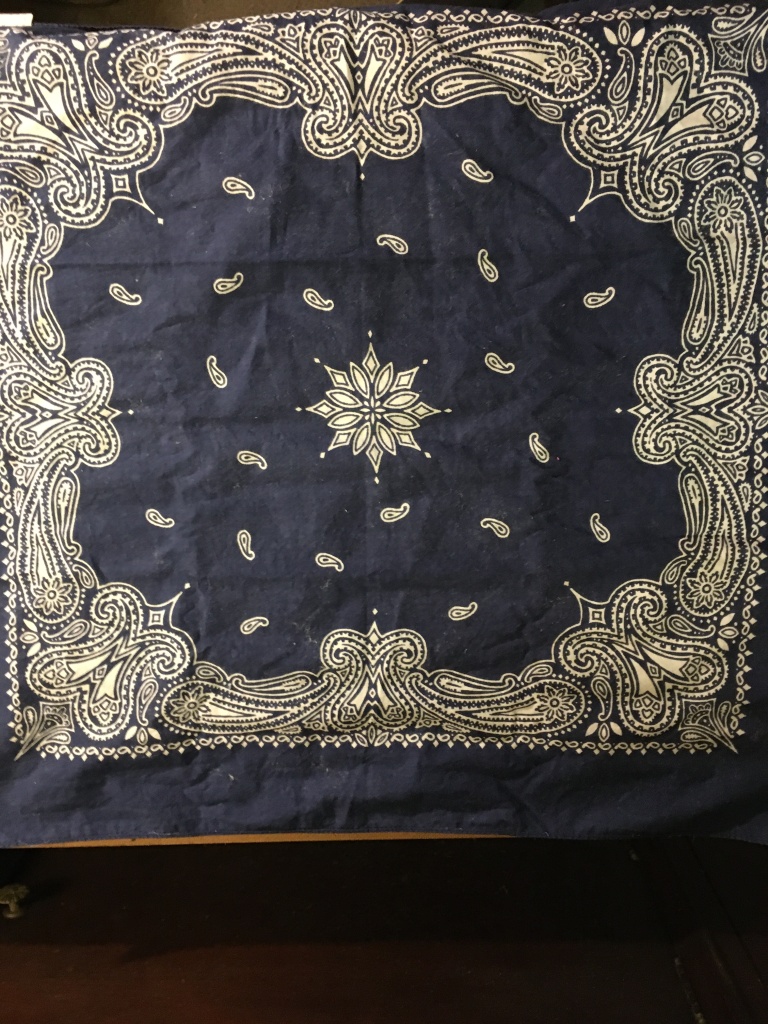
Next up is the bandana. Lay it out flat.

Fold about 1/3 of one edge over.

Then fold the other edge over the first one.

Take the loops of cord and put the folded bandana into them.

Then space the loops on each side dividing the bandana into thirds as below.

Fold one side over the center third.

And repeat with the remaining side.

Take the last piece you folded and fold each corner to the center as below.

Then take the top layer of the other side and place the folded section inside it.

Push it in as far as it will go and unfold the corners and tuck them in tight.

Move the elastic and cord to the top of the folded bandana.

Place one hand into the center and pull up with the elastic to pull the sides in and you’re ready to slip it on.

Hair tie goes in the back of the head and one side of each loop goes over the top of each ear. Adjust the top and bottom to fit tightly around your nose and chin and you now have 9 layers of cloth for filtration.

Hope this helps. Stay safe out there!

Still kicking

December 7, 2017

Just not as high or hard.

Needed to charge the tractor battery (alternator quit working and it’s been easier to charge the battery every few uses than to repair it). Got the extension cord and went to pick up the battery charger and realized that I couldn’t carry both as the plastic handle of the charger had broken off a couple of winters ago. So time to replace the handle. To take the charger apart required prying tabs out of holes in the bottom. Screwdriver was too big and needed an angle on the end so that was out. Bent a hook on a rusty #8 box nail and with visegrips pried them out. Found a piece of strapping and cut it to length. Got it through the holes and needed to punch holes in it to put a screw through to join the ends together. Nail wouldn’t punch through this stuff so got the torch out and heated a piece of wire and melted holes in both ends. Bolted them together and put the top back on. Carries much better now!

Battery charging and we’re fixing to head to Flamingo Flea Market to take another load of stuff to put in the building a friend has rented to sell out of. Will be working a few days a month in exchange for being able to put stuff there to sell.

For now the following show the outside of the building. More pictures when I get them.


Coctel De Camarones (Colombian-Style Shrimp Ceviche Cocktail) | Serious Eats : Recipes

July 30, 2015

Coctel De Camarones (Colombian-Style Shrimp Ceviche Cocktail) | Serious Eats : Recipes.

Got the shrimp last night.  Have everything else other than fresh parsley leaves which I “may” go out and get in a bit or may go with dried and rehydrated.  Could not find fresh shrimp so ended up with frozen.  Will put in fridge to thaw in a few.  Not sure if we’re having this for lunch or supper or both. 🙂

Sheath for Knife

June 30, 2015

Decided to go ahead and make a sheath for the new knife. Dug through the pile and found a piece that looked about right.

Piece of leather

Piece of leather

Fit the knife about right when folded over.

Fits knife

Fits knife

Bit at the top folded down and looks like it will work as the belt loop.

Belt Loop

Belt Loop

Got the tools out and some rivets. Punched the first hole in the belt loop and riveted it with the hammer as the rivet tool doesn’t have a deep enough throat to reach that one. Hole punch just fit.

Tools needed

Tools needed

Here’s how it looks from the back.

Belt loop from the back

Belt loop from the back

Used the new knife to trim the leather up.  Did a great job!  Top rivet was first one put in. Put the knife in place and pulled the leather around it and slid it in and out to adjust the fit and then punched the hole and put the rivet in. Second one was the one at the bottom to stop the blade from going any lower. Third one was through 3 thicknesses of leather as it holds the other side of the belt loop and took a longer rivet.

Extra trimmed off and rivets in

Extra trimmed off and rivets in

Last 2 rivets in and the sheath is done other than for oiling/waxing.

And done

And done

Knife fits good and tight and shouldn’t come out in the woods.

Fit is good and tight

Fit is good and tight

And that’s the sheath done. One piece of leather and 6 rivets. A small pile of scrap leather and all the tools used in the making.

New Knife

June 30, 2015

Had an old carbon steel kitchen/steak knife that’s been kicking around for a while. Been wanting to do something with it and since our plans for the day got rained out decided to see what I could make. Got into the antler pile and found a piece that felt about right in my hand and with a little cutting, trimming, grinding, and filing got it to where it looked about right with the blade. Drilled holes in the end and dug/cut/filed till I could fit the tang down in the hole. Cut a piece of brass to fit the end of the antler and cut a slot for the blade. Cut a piece of brass rod and drilled a hole in the antler to pin the blade in. Kneaded up some epoxy and filled the holes up and then forced the blade in. Put the pin in and before the epoxy set beat on the ends with a hammer to swell them and set them in the holes and then let it set up.  Once set up filed the guard and pin to properly fit the shape of the handle and filed the handle smooth. Did a bit of sanding and sharpened the blade and have a much nicer knife.  No pix of the process but here are a couple of the finished product.

Antler knife

Antler knife

Other side

Other side

Haven’t decided on what kind of sheath I’m gonna make for it yet. Handle is a bit long for the blade but it feels good in the hand so am going to leave it this way and use it for a while and see how it works out.

Vardo – A couple of years later

June 26, 2015

Thought I had posted pictures of the vardo/camper after I got it finished enough to use but after looking around doesn’t look like I did.  So went out this afternoon and took a few.

This first one is just a shot from the side.  Canvas wall covering is holding up well.

From the Side

From the Side

And a shot from the front or hitch end.  Am going to redo this side and put canvas over the wood.  Battens are screwed on so shouldn’t be too much of a problem.

From the front

From the front

The back or door side.  Still haven’t replaced the old camper door.  Just another of those round tuits…

Back side

Back side

The bed in it’s daytime or single occupancy mode. Note the pullout table under the center.

Bed in Single/Sofa Position

Bed in Single/Sofa Position

And here it is with the frame pulled out.  There are matching slats under the other side. 1×2’s with about a quarter inch left between them and screwed down on each end.  Works quite well.

Bed Frame Extended

Bed Frame Extended

The table pulled out but leg not dropped down.

Table From Under Bed

Table From Under Bed

And a shot of the leg still in storage position.  Door latches used to keep it up as well as to lock it to the floor if the rug wasn’t down.

Table Leg in Storage Position

Table Leg in Storage Position

Seat for the table or just chilling on the side over the wheel well. And the 2×4 that the movable part of the bed frame slides on. Seemed the simplest solution at the time and has worked out rather well.

2x4 That Bed Frame Rides On

2×4 That Bed Frame Rides On

Seat open showing storage area within.  I’ve got assorted tools stored in this one.  The one on the other side has food stuff and extra paper products.

Under Seat Storage

Under Seat Storage

Food, water, and assorted stuff storage and work area. Microwave for times we are camping with power.

Storage, Food Prep, Microwave

Storage, Food Prep, Microwave

Other side work/cooking area with bucket storage underneath. One is the toilet for those times when we are boon-docking and the other holds kerosene and lanterns to keep the odor down.

Other Side Storage and Work/Cooking Area

Other Side Storage and Work/Cooking Area

Paper towel and spice/seasoning holder with high tech hold down. 😉

High Tech Paper Towel Roll Holder - Rock and Rope

High Tech Paper Towel Roll Holder – Rock and Rope

And that’s pretty much it. We have used it several times over the last couple of years and it has worked out pretty good.  Going to add additional leaves to the springs and better tires asap.  Looking at putting in an AC too for summer camping. Will update as I get er done.

Till later,
Dave

Home Page of Legion VI Ferrata Fidelas Constans

June 25, 2015

Home Page of Legion VI Ferrata Fidelas Constans. Interesting group. Site doesn’t appear to have been updated in a while.

Animated Knots by Grog | How to Tie Knots | Fishing, Boating, Climbing, Scouting, Search and Rescue, Household, Decorative, Rope Care,

June 24, 2015

Animated Knots by Grog | How to Tie Knots | Fishing, Boating, Climbing, Scouting, Search and Rescue, Household, Decorative, Rope Care,.  Knots, and more knots.

Another link mainly for me but if you have any interest in learning how to tie knots take a gander and plan to spend some quality time.  Good Stuff!

Premium Hemp and Jewelry Supplies by HempCraft on Etsy

June 24, 2015

Premium Hemp and Jewelry Supplies by HempCraft on Etsy. Wide assortment of hemp twine and cord.

Cleaning up tabs prior to reinstalling Puppy Linux so want to get the ones I am interested in somewhere in the cloud so I can find them again. 🙂

Macrame Projects

June 24, 2015

Macrame Projects. How-to’s and videos on macrame.  Good stuff!  Here again mainly a link for me.